
The Account List always appears in the form of Trial Balance showing balance of each account all the times automatically. In account list window you can do following:
Take the highlighted cursor where you want to insert the account. Press F7 and a new line will be inserted with the logical account number you can insert. You can either overwrite the number you want to create, press Enter to confirm or press Esc to discard the number and go back
Take the highlighted cursor to the account and press F6. You can only delete the individual code which doeses not contain any data.
Take the highlighted cursor where you want to edit the title and press F8 key. Edit the Title and press Enter key. Press Esc key to come out from the editing of Title
Press F9 key. To search a particular spelling press again F9 key. Give first character of spelling you want to search.
Press F10 key. Type the account no, you want to search
Take the highlighted cursor to the account whose address is to be written and press F5 key and type in the address
Whenever you take out printout, you have two choices, either to make a File or to print it directly on printer. The Print option prints the printout directly on printer. The File option makes a PRINT FILE on your disk which you can at any time View, Print, Rename, Delete etc. the print file window appears automatically when “F”is pressed in the printout option or when F1 key is pressed in any menu.
Press “A”to add a new name. Type in the name you want to keep for the print files. When the name is added in the windows take cursor to the highlighted name and press Enter key. The print file will be saved with that name. You can however, select the existing name as well, in this case, the new file will be overwrite on the existing one and your old print file will be los
Take highlighted cursor to the name of the file you want to see and press “V”and then confirm by pressing “Y”for yes. The File will appear on the screen. The left cursor on top shows filename with which it is saved on the disk with extension *.PRN. The page number, line number and column number is also shown on top line. The last line shows the key you can use inside this screen. Press End key to come out of the viewing.
Take the highlighted cursor to name of the file you want to print and press “P”and then confirm by pressing “Y”for yes. The screen asking starting and ending page will appear press Enter and “Y”and the file will start printing on the printer.
Press F9 key. To search a particular spelling press again F9 key. Give first character of spelling you want to search.
Press “S”and you will be asked the spelling to search. Give spelling or press Enter to exit.
Press “R”to rename the file at any time you will be asked the new name. Give new and press Enter to exit.
Use this option to write opening balance for the year. The opening balance must be of the date earlier then the accounting year date. In opening balance window:-
If you have more then one data directory, you can get the closing balance of last year directory automatically into opening balance with this option. The name of directory and range of account numbers to be included are asked while updating opening balance from any other directory.
This option creates a new data directory and takes the closing balance of this year directory to new directory. The account numbers range, whose balances are to be picked up are asked. This option must be used with Caution as it will over write data if the given directory name Contain any data.
The book window appears on the screen. You can make upto 9999 types of books. Each book has:-
For each day, you can also write a double entry book called General Journal. The voucher number can be generated automatically or written manually. The new voucher number is generated every time the debit and credit total matches.
Operating Cash Book or General Journal Page
The date must be with in the accounting year given. To exit without giving any date press Esc
The starting date must be in the accounting year given and the end date must be equal or greater than the starting date otherwise it will not go out
The account number should be given correctly. To go to the Account list window press “Tab”key or hold down Ctrl key and press “T”to delete every thing from the highlighted cursor and then press Enter. Account list window appears and you can select the name/account number of your choice by pressing Enter. If you press Esc or End key, the account number is noted selected and instead you are quitted from your last option.
Press Enter key to generate automatic number and Enter key again to accept it. Alternatively overwrite the number and press Enter key to accept.
Any type of vouchers can be printed by selecting this option. The range of vouchers to be printed and the range of date from which these vouchers are to be picked is asked before printing.
Any type of vouchers can be renumbered by any new series of number in this option. The number process asked following: -
For voucher printing, you can define your own foot notes such as prepared by, approved by, etc. by this option for all the three type of vouchers that is Receipt Voucher, Payment Voucher and Journal Voucher.
This option print any one of the selected number of book with the columns you have defined in it. As many books as you want can be defined for printing such as Sales Book, Purchase Book, etc. the data are picked from the columns in which account numbers are defines. The book printout offers various choices to generate the printout that suits your individual need. The choices offered are: -
This option prints the General Journal for the given range of period.
This option print a periodic flow of transactions done in a selected accounts that are define in a book. The printout offers you the choice of:
This option prints ledger with many a choices that include:
Two type of trial balance are printed. One showing update debit and credit balance and other asking the period, credits during the period and closing balance. The figure of each account is calculated from the starting and ending date given by a user.
If “Y” is typed in Opening Balance column, the Four column Trial Balance showing Opening, Debit and Credit Activity during the period and closing balance is printed.
When “N”is typed the net balance of given period is printed in two columns, Debit and Credit.
This option prints entry wise analysis of the outstanding amount of an account, analyzing each entries age, and printing it in the relevant column of the age
This option prints the summary in the form of Trial Balance analyzing the balance of each account as per the again period defined
This option prints the entry wise analysis of the outstanding amount of an account, analyzing each entries by the month in which it appeared
This option prints the summary in the form of Trial Balance analyzing the balance of each account by month.
This option extracts transaction of a selected account and calculates activities on daily basis. The amount of daily activity is printed along with its progressive balance and mark-up/interest. The option offers you to calculate Markup or Interest before printout if mark-up is to printed then give rate in Rupees per thousand per day if Interest is to be calculated then give rate per annum.
This option prints balances in the form of a Trial Balance for given range of accounts with interest/markup accrued on it and its gross amount. Any account having nil balance also comes in the printout if any interest on it is calculated for the activity done in the give range of period.
When this option is selected by either pressing Enter Key of “A”key, a Format screen appears. The following features are available on the Format Screen: -
Editing: in this mode you can do editing in the highlighted area. When you press Enter Key the highlighted line becomes editable
Scrolling: in this mode you can scroll anywhere on the Format. The keys which can be used in scrolling mode are as under: -
The last line shows the Function Keys, which can be used for Help. Use F3 key to write title of report such as Balance Sheet, Profit and Loss Account, etc
There are Eight columns in the format and you can add as many lines as you want to make the format of any report you want. Each one of the Eight columns can be edited for data entry. The data which can be written in each column is as under: -
This is the second option of the sub-menu. It generates the printout from the format file given. When this option is selected either by pressing Enter Key of “B”key, the two windows are offered for selecting the month. The report is generated for the year ending on the last date of the selected month.
When the period of Adjustment are given all the figures pick data or Adjustment entries of this period and add into Accounts Balance and gives the Adjusted figures in the reports.
The choice of Opening Balance controls whether to include opening balances or not. As a rule you give “Y”when printing Balance Sheet formats and “N”when printing Profit & Loss Account. Once the month is selected, it asks: - PRINT ON FILE? PRINTER? OR QUIT? (F/P/Q) If you select “Q”it exits from this option and goes back to the sub-menu. If “P”is given, then the printout is generated and sent to the Printer. If “F”is given, then a window is presented giving alphabetical list of names of all the files you have so far made of the printouts. The feature of this dynamic window is described already earlier in this write-up.
It can be seen in the printout that the Note is generated automatically by the program. For each Note Number 001, 002, 003 etc, the details are generated from the range of accounts you give. Whenever a Control Account is found in the account range, figures of all its subsidiary accounts are printed inside the box and its total is printed below the box. This powerful feature must be kept in mind while giving the range of accounts at the time of making the format file. You can get details on all your control account in Note if range of accounts is given effectively.
The figures, which are calculated by the program, is always for two years. This Year and the Last Year. The closing date for each of this year is calculated from the month selected by the user while printing
There are two built in programs EADBF.EXE and EAUDT.EXE, which are used to convert your data from Release I to Release II. Suppose your Release I data file is in directory C:\DATA92. To convert it into Release II data file you have to do following: -
C:\EAP2\EADBF C:\DATA92II (the above command will start converting temporary files named TEMP1.DBF & TEMP3.DBF in second directory C:\DATA92II) Now after completion of this type C:\EAP2\EAUDT (This will ask you the range of date, give the date of which data is to be picked up, always give the accounting year as date for example 01/01/91 to 31/12/91)
This will complete conversion you can now start package. Please follow these steps to Install and Operate the programs. You have one company, whose blank data files are zipped and sent to you under the following filename on the attached diskette: -
EAPDF.EXE (Blank data Files) Similarly, there is one program disk, which contains various programs for your operation. EAPDISK1.EXE (Contains EAP.EXE the main Accounting Packages and VEREAP.EXE the verification program you run in case of power failure, etc) EAPDISK2.EXE (Contain various utility programs like REVEALN.COM for revealing the 8 words registration number SETACTYR.CON for setting up accounting year) EAPDEMO.EXE (Contains Demonstration program which you run until you receive hardware definition file from us. The instruction regarding this is enclosed). Now these are the step-by-step instruction for your reference and implementation.
The program files in EAPDISK1.EXE and EAPDISK2.EXE should be installed in the directory named EAP as under: - MD\EAP CD\EAP COPY A:\PK*.* A:\EAPDISK1 A:\EAPDISK2 A:\EAPDEMO
For each one of your companies, you will have to make year wise directory and install blank files in it and then copy station files in it for operating it on all the computers as follows: -
To operate in any one of the above data directories you take following steps: -
To operate in any one of the above data directories you take following steps
To make backup of your data directories on Floppy Disk following steps are to be followed Remember to use for each company and each year use at least six diskettes labeled as MONDAY, TUESDAY…SATURDAY
Whenever you hardware is changed or machine is changed the new station file will also be required which you can get from us by taking out 8 words registration number by running REVEALN program on your computer.
The Electronic Accountant comes with the utility DEFPW.EXE, which allows the user to set his own passwords for operating the package. The user can define upto three passwords for levels A,B and C.
The level A password allows the user to do add new entries and allows its editing and modification. Once the entries have been saved, it cannot be edited or modified. Only the last page/date or data entry is allowed modification for correction of any data entry mistakes. As soon as data is entered in the next date, the previous date entry is protected.
The level C Password allows the user to only see the data; no modification or data entry is allowed if the package is started with this level of password.
To define the three levels of passwords, you simply go into the data directory and operate the program DEFPW.EXE. for example, your data directory is DATA92 and your EAP package is installed in EAP directory, you will type following commands to operate the package:- CD\DATA92 C:\EAP\DEFPW
The DEFPW first ask you the password. Here you give the level A password, which you have set through DEFPW when it was use last. If you are using it for the first time, press ENTER key
The Electronic Accounting package will start only with the password set through this utility. If no passwords are set , the ENTER key is assumed to be the password.
Whenever you type passwords while accessing EAP.EXE or DEFPW.EXE file, you cannot see the characters you type for security reasons. As soon as press ENTER key, it accepts the characters you typed before pressing ENTER as password.
Any Twelve-keyboard characters can be set as password. Remember the password is not only case sensitive, but also all the control code characters sensitive.
Remember also that you are not allowed to modify or edit data of any date for which editing is restricted by the DEFDATE.EXE utility even if the package is started by level A password
The Electronic Accounting Package allows security of date by restricting the editing by a define date. There are two date entry formats one is Single Entry system that is Cash and Bank Book and other is Double Entry system that is General Journal
The user can restrict editing or modification by defining the dates for both the books separately through a utility “DEFDATE.EXE”
To define the date for restricting date modification simply go into the date directory and operate the program DEFDATE.EXE. for Example, your data directory is DATE92 and your EAP package is installed in EAP directory, you will type following commands to operate the package: - CD\DATA92 C:\EAP\DEFDATE
The DEFDATE first ask you the password. Here you give the level. A password, which you have set through DEFPW when it was used last. If you are using it for the first time, then press ENTER key Access will not be allowed if any key other than the password set a Level A is typed. Once access is allowed, the program will show you the current date, which is set for Cash and Bank Book and general Journal. You can modify and change this date as per your choice.
Pressing of F1 key will show you details of the dates previously set and when was it changed and who changed it.
At any time, if the user quits the Electronic Accountant package incorrectly, for example, while entering data power goes off or the user puts the power off accidentally, there is every possibility of data lose. There is a built in protection system in the package, which will shows you that the last time when the package was used it was not quitted properly and prompt you to use VEREAP package.
The VEREAP program checks all the data, verifies all the balances and postings in the ledger. The user can use this package to verify the integrity of this data
To operate the program, simply go into the data directory and operate the program VEREAP.EXE. For example, your data directory is DATA92 and your EAP package is installed in EAP directory, you will type following commands to operate the package: - CD\DATA92 C:\EAP\VEREAP
Electronic Accounting requires for each machine a hardware definition file named PW4.DBF. Every machine has a unique definition of hardware, which is stored in this file, and therefore a program copied from one machine will not run on another machine until you will have a registered hardware definition file
The procedures for GETTING the hardware definition file from us INSTALLING it on your computer and RUNNING the program till the hardware definition file is not installed are described below: -
To operate the program, simply go into the data directory and operate the program VEREAP.EXE. For example, your data directory is DATA92 and your EAP package is installed in EAP directory, you will type following commands to operate the package: - CD\DATA92 C:\EAP\VEREAP
The Electronic Accounting Package can be operated on networking environment simultaneously by all the users. Following are the requirements: -
The user can modify or make batch files for each of his station separately for easy operation.
This option shows you the current default values for the following things: -
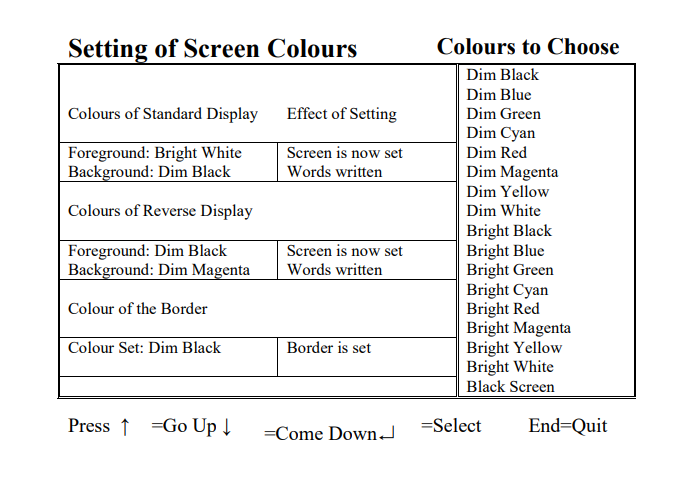
This option sets the colours of screen as per the user’s choice; there are three types of colours that can be set for the EAP screens.
This option allows you to set the last number of your Receipt Voucher, Payment Voucher, and Journal Voucher. The automatic voucher numbering is done by adding one to the number set here. Every new voucher number is automatically updated here so at any time you can see what was your last Receipt, Payment or Journal Voucher number.
If no voucher numbers are set in the Cash Book columns of RV and PV, then only the Receipt and Payment Voucher numbers are generated from here. Otherwise, it is generated from the number see in RV and PV columns. This way, the user can set different number series for different Cash Book columns.
This option shows you the current dates upto which data is restricted for modification. To change this date refer option SECURING THE DATA BY DATE.
The user can modify or make batch files for each of his station separately for easy operation.
Your system must have CONFIG.SYS and AUTOEXEC.BAT on the Hard Disk drive C.If any of the above files does not exist then create it by a Word Star non-document file of DOS COPY command. These files must be modified to have following commands: -
After modifying /creating above two files CONFIG.SYS and
AUTOEXEC.BAT restart the machine.
Now verify that you have typed above commands correctly by typing
SET. It will display the following:-
This utility allows the user to convert data from any given EAP data directory into two databases files, one consisting of Account List and other consisting of Daily Transaction Entry. The structures of these Datafiles are defined in detail in the heading Datafiles for interfacing EAP with other Software’s
This utility allows the user to post data from two database files one
consisting of Account List and other consisting of Daily Transaction
Entry, to any given EAP data directory.
The file structures of two database files have following structures,
which must be followed for interfacing it with the EAP data
directories.
The name to be assigned to this file is asked at the beginning of the utility and its structure is created as under: -
| No | Description | Field Name | Field Type | Width | Dec |
|---|---|---|---|---|---|
| 1. | Account Number | ACNO | Character | 16 | |
| 2. | Account Title | ACNM | Character | 40 | |
| 3. | Account Type | ACTP | Character | 1 | |
| 4. | Type of Address | ADDTIPE | Character | 1 | |
| 5. | Address Card | ADDCARD | Character | 254 | |
| 6. | Address Card | APPCARD | Character | 24 |
The name to be assigned to this file is asked at the beginning of the utility and its structure is created as under: -
| No | Description | Field Name | Field Type | Width | Dec |
|---|---|---|---|---|---|
| 1. | Type of Transaction | TTIPE | Character | 1 | |
| 2. | Date of Entry | DOE | DATE | 8 | |
| 3. | Voucher No | VNE | Numeric | 6 | |
| 4. | Narration | POE | Character | 52 | |
| 5. | Amount of Entry | AOE | Numeric | 14 | 2 |
| 6. | Account Number | ACNO | Character | 16 | |
| 7. | Quantity | AQTY | Numeric | 12 | 2 |
| 8. | Rate | ARATE | Numeric | 14 | 4 |
| 9. | Invoice No | AINO | Numeric | 6 | 0 |
| Field Name | Explanation of Fields | ||||||||||||||||||||||||||||||||||||||||||||||||||||||||||||||||||||||||
|---|---|---|---|---|---|---|---|---|---|---|---|---|---|---|---|---|---|---|---|---|---|---|---|---|---|---|---|---|---|---|---|---|---|---|---|---|---|---|---|---|---|---|---|---|---|---|---|---|---|---|---|---|---|---|---|---|---|---|---|---|---|---|---|---|---|---|---|---|---|---|---|---|---|
| ACNO | The account number must be in multiple of 4 digits If the number is below 4 digit then it must be padded with zero for example ‘1’is to be written as ‘0001’. Each multiple of four digit indicates the generation “of that account. For example 0010001 means 1.1 00010002 means 1.2 and so on and both are 2nd generation account subsidiary of ‘0001’account or Account No.1 | ||||||||||||||||||||||||||||||||||||||||||||||||||||||||||||||||||||||||
| ACNM | This is the title or description of account | ||||||||||||||||||||||||||||||||||||||||||||||||||||||||||||||||||||||||
| ACTP | Here any one of the following character is to be
written in upper case:-
|
||||||||||||||||||||||||||||||||||||||||||||||||||||||||||||||||||||||||
| ADDTIPE | Indicates what type of Address card this Account
has. Any one of following characters is to be
assigned here:-
|
||||||||||||||||||||||||||||||||||||||||||||||||||||||||||||||||||||||||
| ADDCARD |
|
||||||||||||||||||||||||||||||||||||||||||||||||||||||||||||||||||||||||
| APPCARD |
|
||||||||||||||||||||||||||||||||||||||||||||||||||||||||||||||||||||||||
| TTIPE | This field indicates type of transaction and can have
any one of the following characters:-
The total of each voucher no, should be zero because the total of all the positive amount of each voucher must match with the total of all the negative amount in that voucher. |
||||||||||||||||||||||||||||||||||||||||||||||||||||||||||||||||||||||||
| DOE | All the entries of same voucher number must have the same date. | ||||||||||||||||||||||||||||||||||||||||||||||||||||||||||||||||||||||||
| VNE | All the Receipt Voucher number must be of six digits
and 1st digit must be 1 that is it should be in range
100001 to 199999 All the Payment Voucher number must be of six digits and 1st digit must be 2 that is it should be in range 200001 to 299999 |
||||||||||||||||||||||||||||||||||||||||||||||||||||||||||||||||||||||||
| AOE | The amount of entry must be positive that is grater than zero if Debit and negative that is less than zero if Credit. If the amount is zero and voucher number and account number is same as previous entry than this will be treated as continuation of narration from previous entry. | ||||||||||||||||||||||||||||||||||||||||||||||||||||||||||||||||||||||||
| POE | The narration can be of 52 characters. For bigger narration repeat the voucher number and account no, of previous entry and write amount is zero |
Database Files used by EAP:-
Indexes used by EAP for above Database Files:-
Binary Data Files used by EA:-